Last week, I stopped at my favorite Farmer's Market store to
pick up some summer sweet corn.
While there, I noticed this red tandem bicycle parked under
a tree laden with apples.
Fortunately, I had my camera with me because I couldn't
resist photographing the lovely scene.
While photographing the pretty apples, I thought this would
be a good way to explain how to create bokeh...beautiful discs of lighted blur
in the background of your photos.
Bokeh (pronounced BO-kah) adds drama and beauty to
photos and is easy to achieve if you pay attention while you are shooting.
Rather than explain all the math and numbers
involved with creating bokeh...I will keep this on
the simple side.
Bokeh is created when the camera captures and blurs light twinkling
around something in the background.
SOOOO....this means, you will want to make sure you have
this light in your background. Trees or other greenery that allow
glints of light to shine through are perfect backdrops for creating bokeh.
I took this photo of a bowl of nectarines in my backyard
while standing and shooting from my normal height.
I did not capture any light glints shining through that thick tree line in the background.
You can see there is no bokeh in the background making
the photo rather boring and flat.
By just squatting down so I can capture sunlight shining
through the upper tree branches, I create bokeh and beauty in the photo.
In other words, you must have light shining through or around something
to get the bokeh!
I used a 50mm 1.4 lens for all of the photos in this blog post.
You can use any camera to create bokeh, but if you
are using a point-and-shoot or your phone camera,
you will need to place your subject a distance from your
background to get the bokeh.
If you are using a DSLR camera, I suggest you learn how to use
your focus points. This is different with every camera, so sit with your
camera manual and learn how to use focus points.
Practice using the focus points and you will get
great focus results in almost every photo you take forever more!
Let's get back to that apple orchard.
I shot in Aperture Priority mode because I wanted to control the aperture.
You can also shoot in manual.
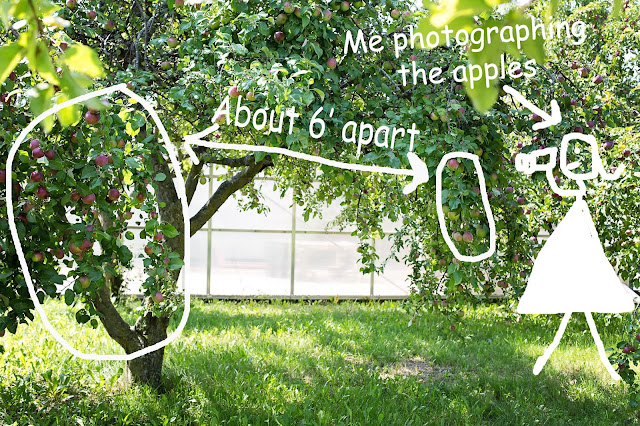
Notice that I have about six feet between the apples I
am photographing and the background that I want to blur into bokeh.
Now you are going to control your aperture to get the blur.
Aperture controls depth-of-field meaning how much in front and
in back of your subject is in focus.
A smaller aperture (Larger number!) means a greater depth-of-field
or more in focus.
Here, I had my aperture shut down to a tiny f/22 and you can see that
even though the background apples are six feet away...they are still
pretty much in focus.
As explained, the smaller aperture created a deep depth-of-field.
Next, I opened up the aperture to f/11 and the background apples
are starting to blur.
At f/8, you can begin to see the bokeh!
Here's f/5 and the bokeh is bigger and more defined.
With the aperture much wider at f/3.2, I get a much shallower depth-of-field
thus, more blur. You can't even tell those are apples in the background.
But the discs of color and light...bokeh....add beauty and sparkle!
With the aperture all the way open at f/1.4 on my lens,
the depth of field is so narrow, even the apples I am shooting
are not totally in focus.
So which of these photos is correct?
ALL of them! It's always up to YOU as the photographer how much
bokeh you prefer. YOU get to create what YOU like!
Experiment and practice with various objects and light situations
and you will be creating bokeh like a pro!


This post tops the charts, Jill. Thank you for making me "get out there" and play with my camera (...and my lenses... and my sunshine :)!
ReplyDeleteThank you so much Jill for your generosity in sharing your photography knowledge. Makes me want to get that camera and go try this right away. ~hugs~ and thanks again. Appreciated :)
ReplyDeleteWOW! What a great post. I love how you shared each picture and showed the difference. You are a great teacher.
ReplyDeleteThank you Jill...